Manage SaaS accounts and apps
Overview
View detailed context on your employee identities, apps, and accounts using the data tables in the Push admin console. On the Employees, Apps, Accounts, Browser extensions, and OAuth apps pages, you can get information about:
Apps your employees are accessing, including when and how they are logging in.
Identity posture risks for each employee and employee account, such as password security issues or a lack of MFA.
Browser extensions installed on employee browsers, their permissions, and how they were installed.
Third-party OAuth integrations connected to your synced identity provider or work platform, including dormant or risky integrations.
You can also manage apps and integrations from these pages, such as:
Removing OAuth integrations you no longer need or do not trust
Classifying app sensitivity level and approval status
Assigning owners to apps
Finally, you can review and modify data from these pages, including resolving shared account findings and removing observed login methods and specific SaaS accounts.
What data is supplied by the identity provider integration vs. the browser extension?
By integrating with your identity provider, Push will provide a view of your SSO apps and connected third-party OAuth integrations, as well as MFA status for your IdP accounts, and OIDC logins (e.g. Sign In with Google and Sign In with Microsoft).
Push can also identify suspicious mail rules in employee inboxes using this integration.
The Push browser extension identifies logins and signups to all apps, including non-SSO apps and free-tier apps. It also identifies the login method and the associated identity provider.
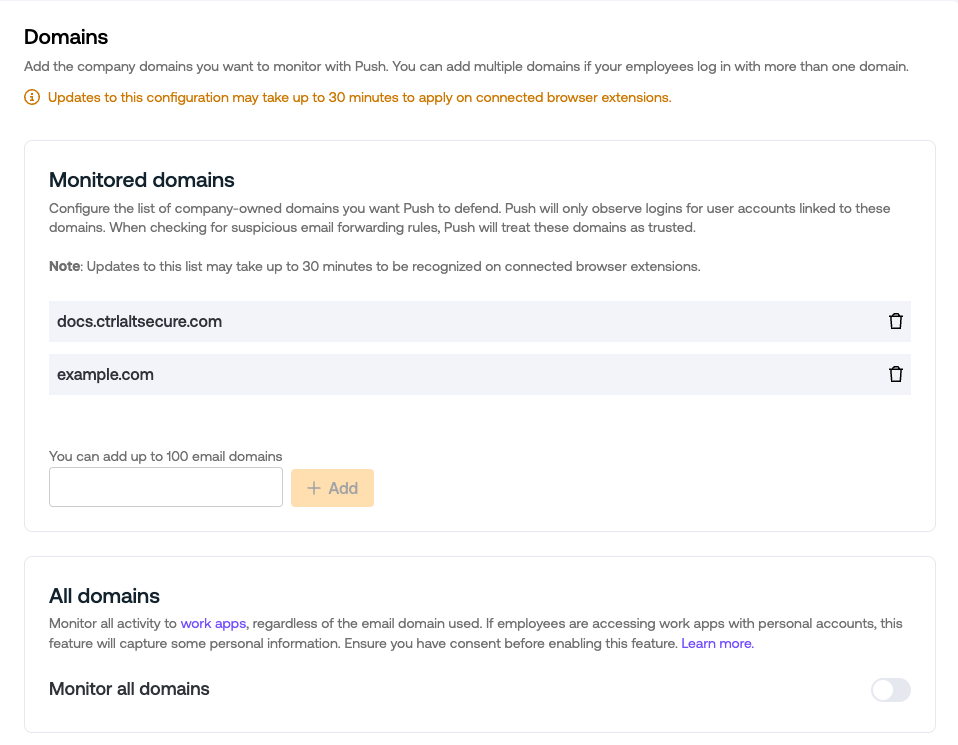
Verify your monitored domains
To ensure you are collecting data from employee activity in the browser, verify that you have configured your monitored domains on the Settings page.
Dashboard
The Dashboard page in the Push admin console provides a snapshot of your detections, identities and security findings, as well as important trends across your deployment.
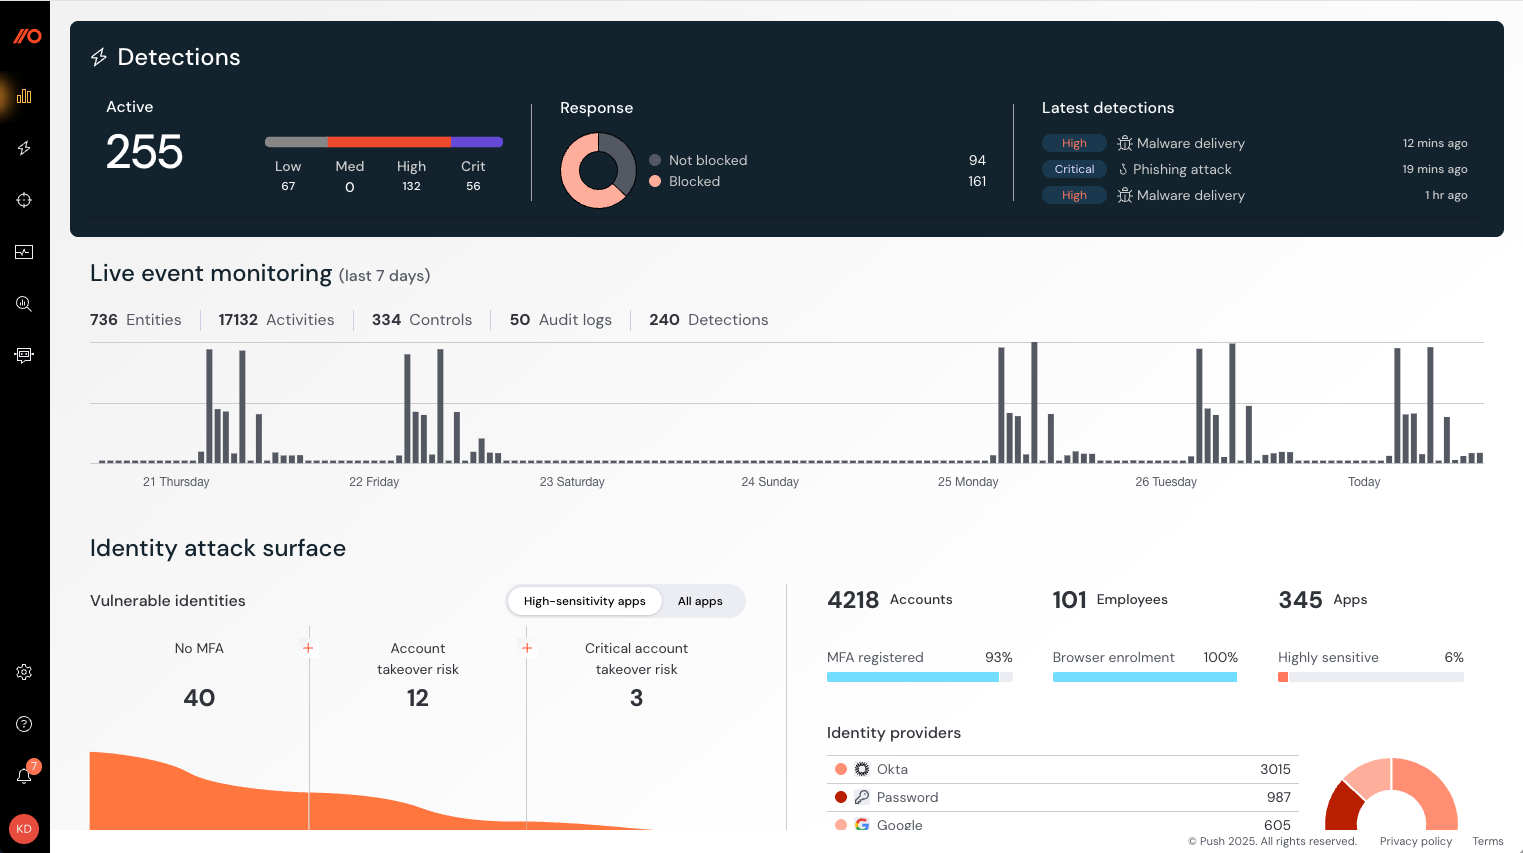
Learn more about the dashboard in Administering Push.
View app usage details
The Employees and Apps pages in the Push admin console provide an overview of SaaS apps in use in your organization from two different perspectives: at the level of the employee, and at the level of the app. On both pages, you can see security findings.
Prerequisites: In order to see complete data, you must complete an API integration with your work platform (Microsoft 365, Google Workspace, or Okta) and enroll employee browsers using the Push browser extension.
Employees page: Available in the left sidebar at Employees, this page shows a per-employee view into which apps a person uses and where they have security issues with their accounts. It includes the following details:
Employee name, email address, and (if available via the API integration or Gravatar) photo.
A list of accounts and apps they use.
Employee browsers enrolled in Push.
Ability to filter by employee name, apps, browsers, OS, browser extension status, ChatOps status, and findings.
Ability to export the list to csv.
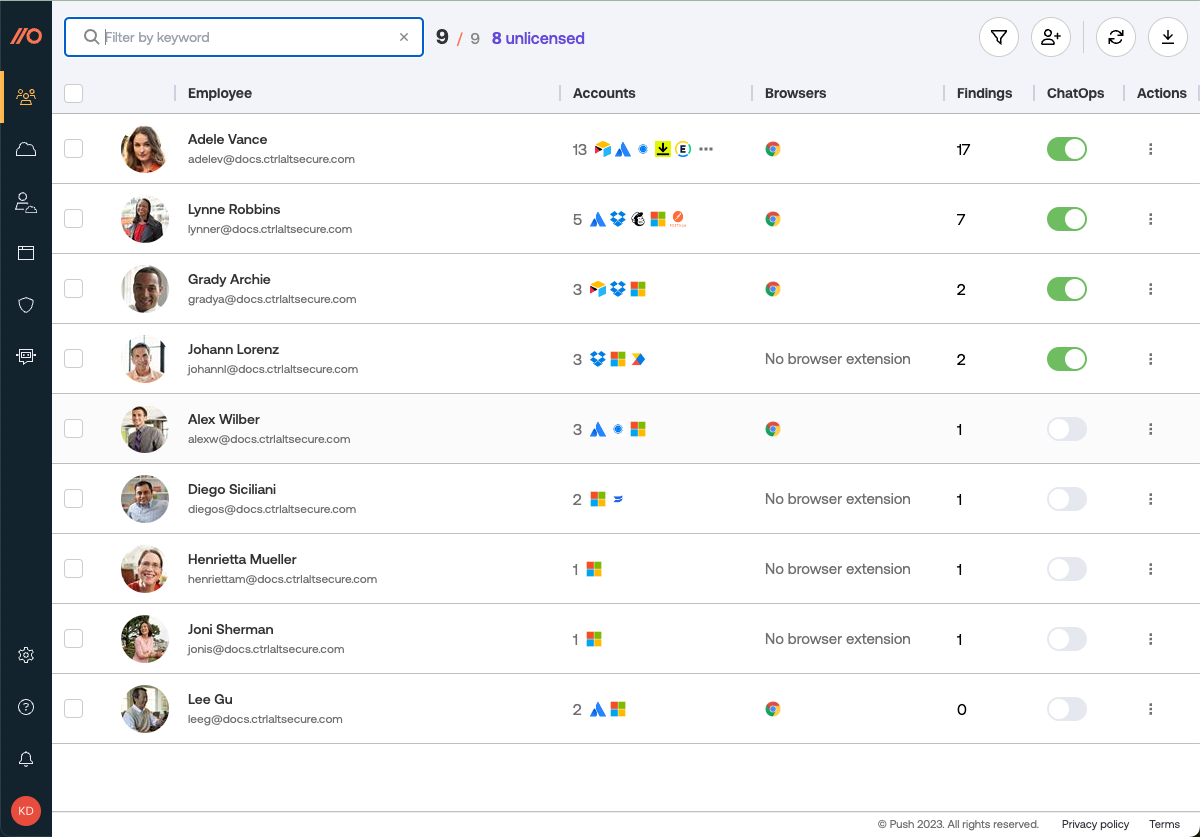
Click on an employee record to see all their apps, accounts, and security findings.
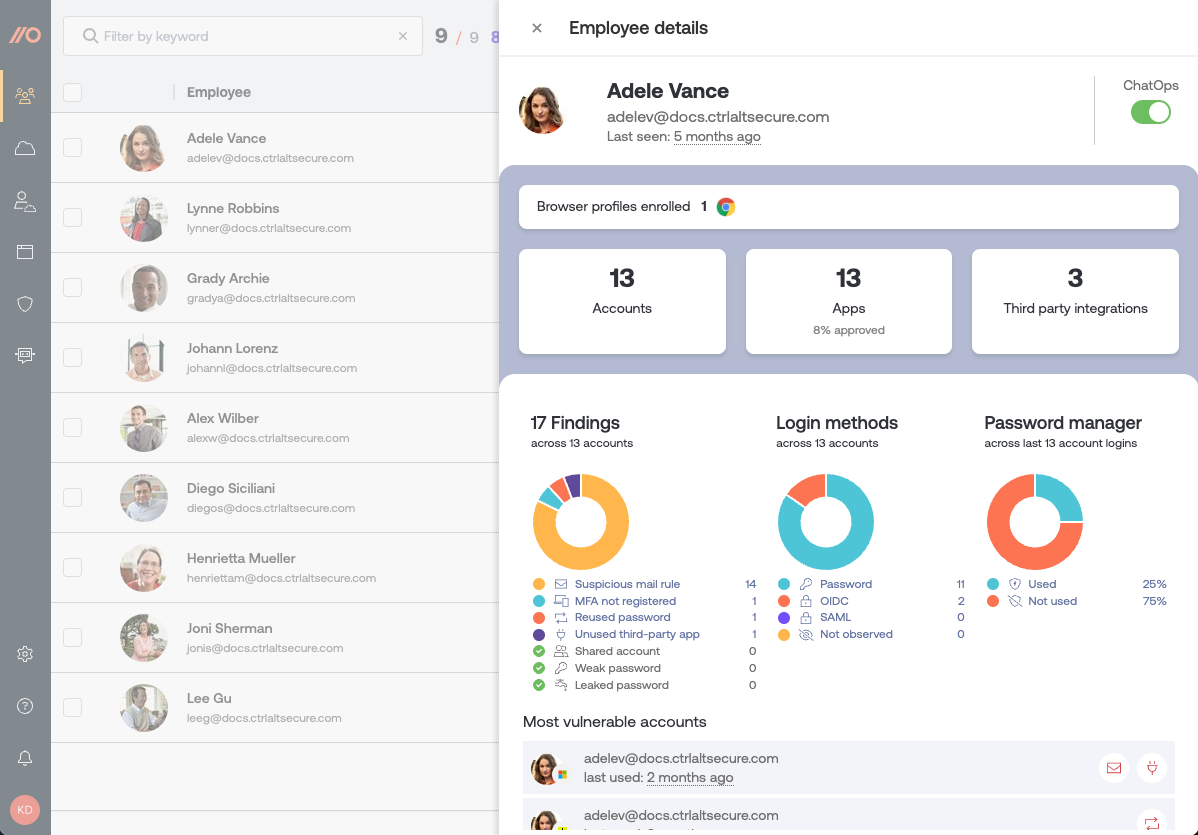
Securing findings can include:
Stolen credentials
Leaked password
Weak password
Reused password
Shared account credentials
Unused third-party OAuth apps
MFA not registered
Suspicious mail rules
The employee record view also shows you:
A breakdown of their login methods (password, OIDC, SAML, Okta SWA).
Whether they're using a password manager in their recent logins.
A list of the accounts that are most vulnerable.
Which browsers they have enrolled in Push, including the browser version and the Push extension version.
When the Push extension last checked in for that employee.
Which employee groups they belong to.
Apps page: Available in the left sidebar at Apps, this page shows you an inventory of all SaaS apps in your environment discovered by Push. It includes the following details:
A table or tile view of all the SaaS apps discovered in your environment.
Security findings for each app, such as leaked or reused passwords, no MFA, shared account credentials, etc.
An entry for each app showing how many accounts use it, and how those accounts logged in.
Ability to filter by app name, which employees use it, login methods, identity provider, last used, app approval and sensitivity level, owner, and security findings.
Icons to represent if an app has been classified according to its sensitivity level and approval status.
Ability to set an owner for each app from the list of licensed employees.
Ability to add free-text notes about an app.
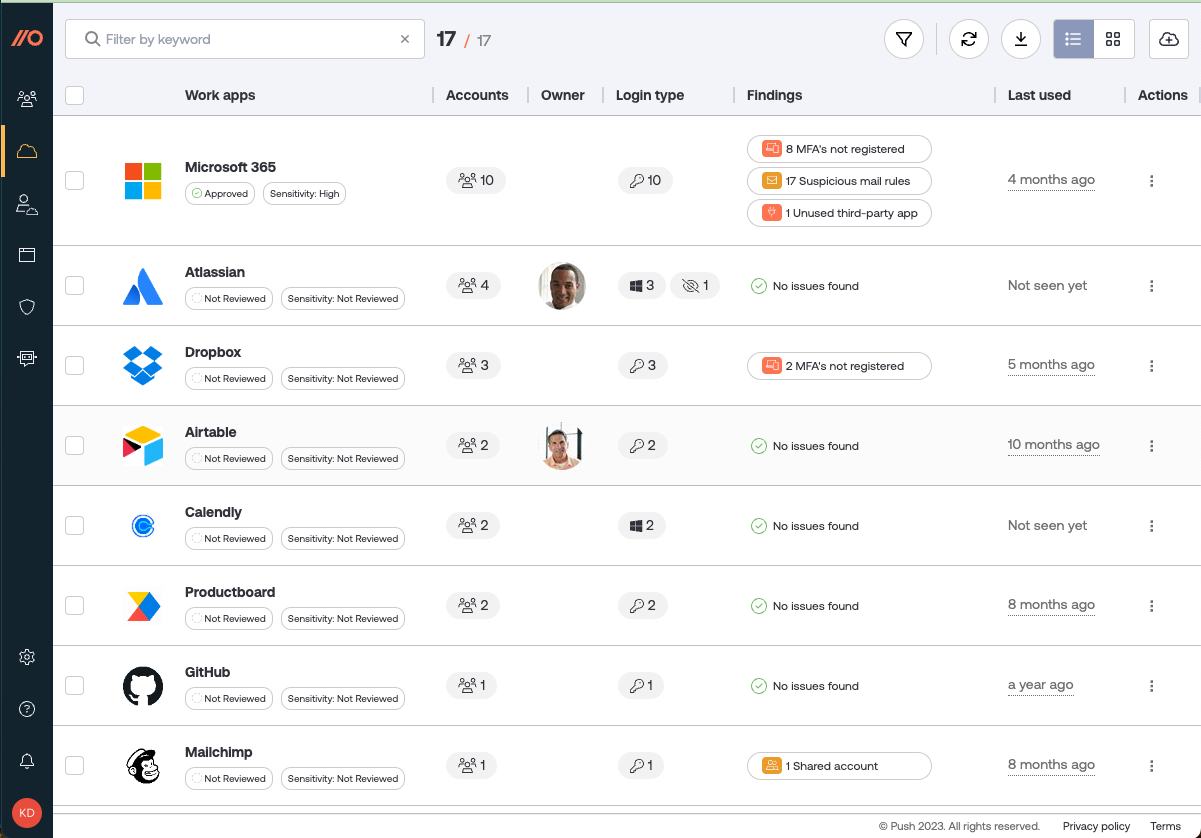
Click on an app entry to view the security findings for that app, and which employees have an account for that app, as well as what login methods are being used to access the app.
View activity for other observed apps
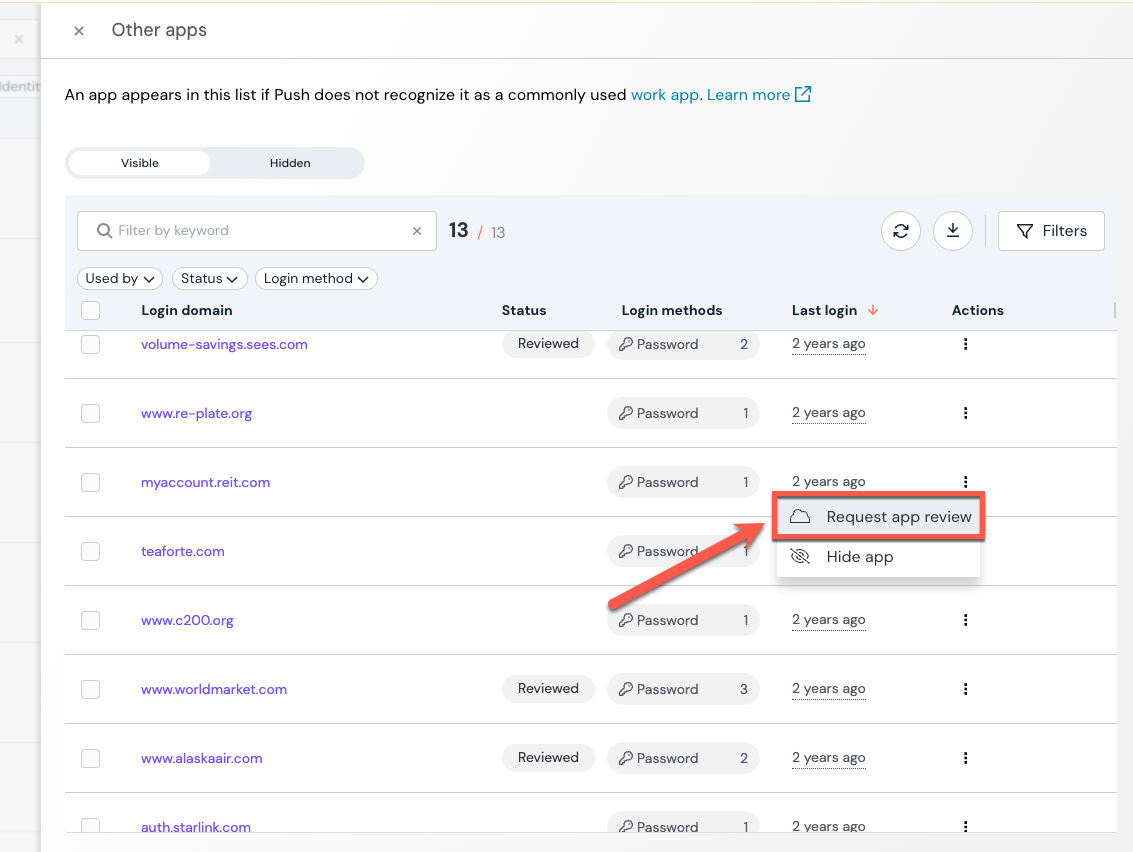
From the Apps page, you can also view other apps that the Push browser extension has observed but doesn’t recognize as work apps, including internal corporate apps. If the extension has discovered additional apps accessed by employees using your specified company-owned domains, you’ll see them linked from the top of the page. Select the link to open a modal with more details.
An app will appear on the Other apps list if Push does not recognize it as a commonly used work app. This includes apps using non-publicly-accessible domains, such as internal apps located at ".corp," ".intranet," or ".internal."
Note that for apps on the Other apps list, you will be able to see the login method and when the app was last seen. Click on the app to see which employee was using it.
If you want to ignore an app, you can select Hide app.
You can request an app review if there are apps in the Other apps list that you use for work. We’ll add them as soon as possible.
To request a review, click on the Actions menu next to the app and select Request app review.
Manage apps
Use the app banners feature to communicate your security policies directly to employees when they visit the login or signup page for an app, or on specific URLs or URL patterns you configure.
From the Controls page, select the App banners tile and configure a rule for how you want the banner to display.
For more examples of how to use app banners, refer to this help article.
Manage app sensitivity, approval state, and owner
You can also use Push to classify your apps' sensitivity level, whether they're approved for use, and who owns them.
From the Apps page, select an app and use the provided fields on the app slideout panel.
Use the Sensitivity level field to classify apps that feature High, Medium, or Low sensitivity data or permissions. Use the Approval status field to classify apps that are approved or unapproved for use in your environment. Note that classifying an app does not trigger any actions in the Push platform; these categories are meant to support your record-keeping and risk assessment activities.
Use the Owner field to set a single owner for an app, selected from the list of licensed employees. The Owner field allows you to document who is responsible for an individual app, such as the primary administrator or team leader, to make communication about app management easier. Note that adding an owner does not trigger any actions in the Push platform.
Manage app labels
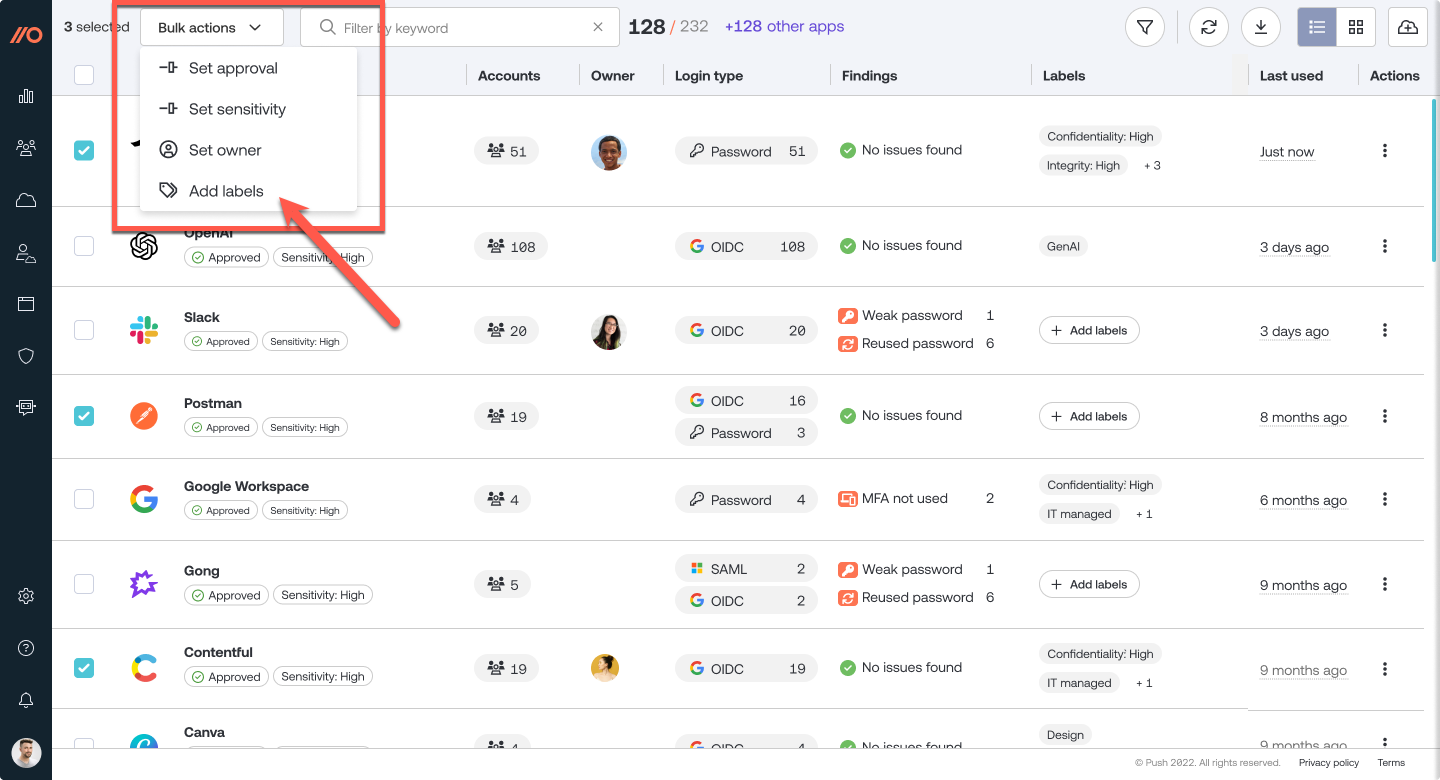
Create your own custom labels to group apps by category using Labels. You can apply labels on a per-app basis or use Bulk actions to apply labels to multiple apps simultaneously.
You may wish to use labels to designate:
The confidentiality, integrity, and availability status of an app.
What kind of data is stored in an app.
Whether an app is IT-managed.
Whether an app has a monthly or annual subscription.
Or anything else you like!
Note: Push also provides options to designate an app’s Sensitivity level and Approval status using a fixed dropdown list of options. We recommend using those fields to list sensitivity level and approval status for apps, as these fields drive specific reporting in the Push dashboard.
On the Apps page, select the app you want to apply a label to and open the slideout. Then select the Labels icon underneath the app description at the top of the slideout.
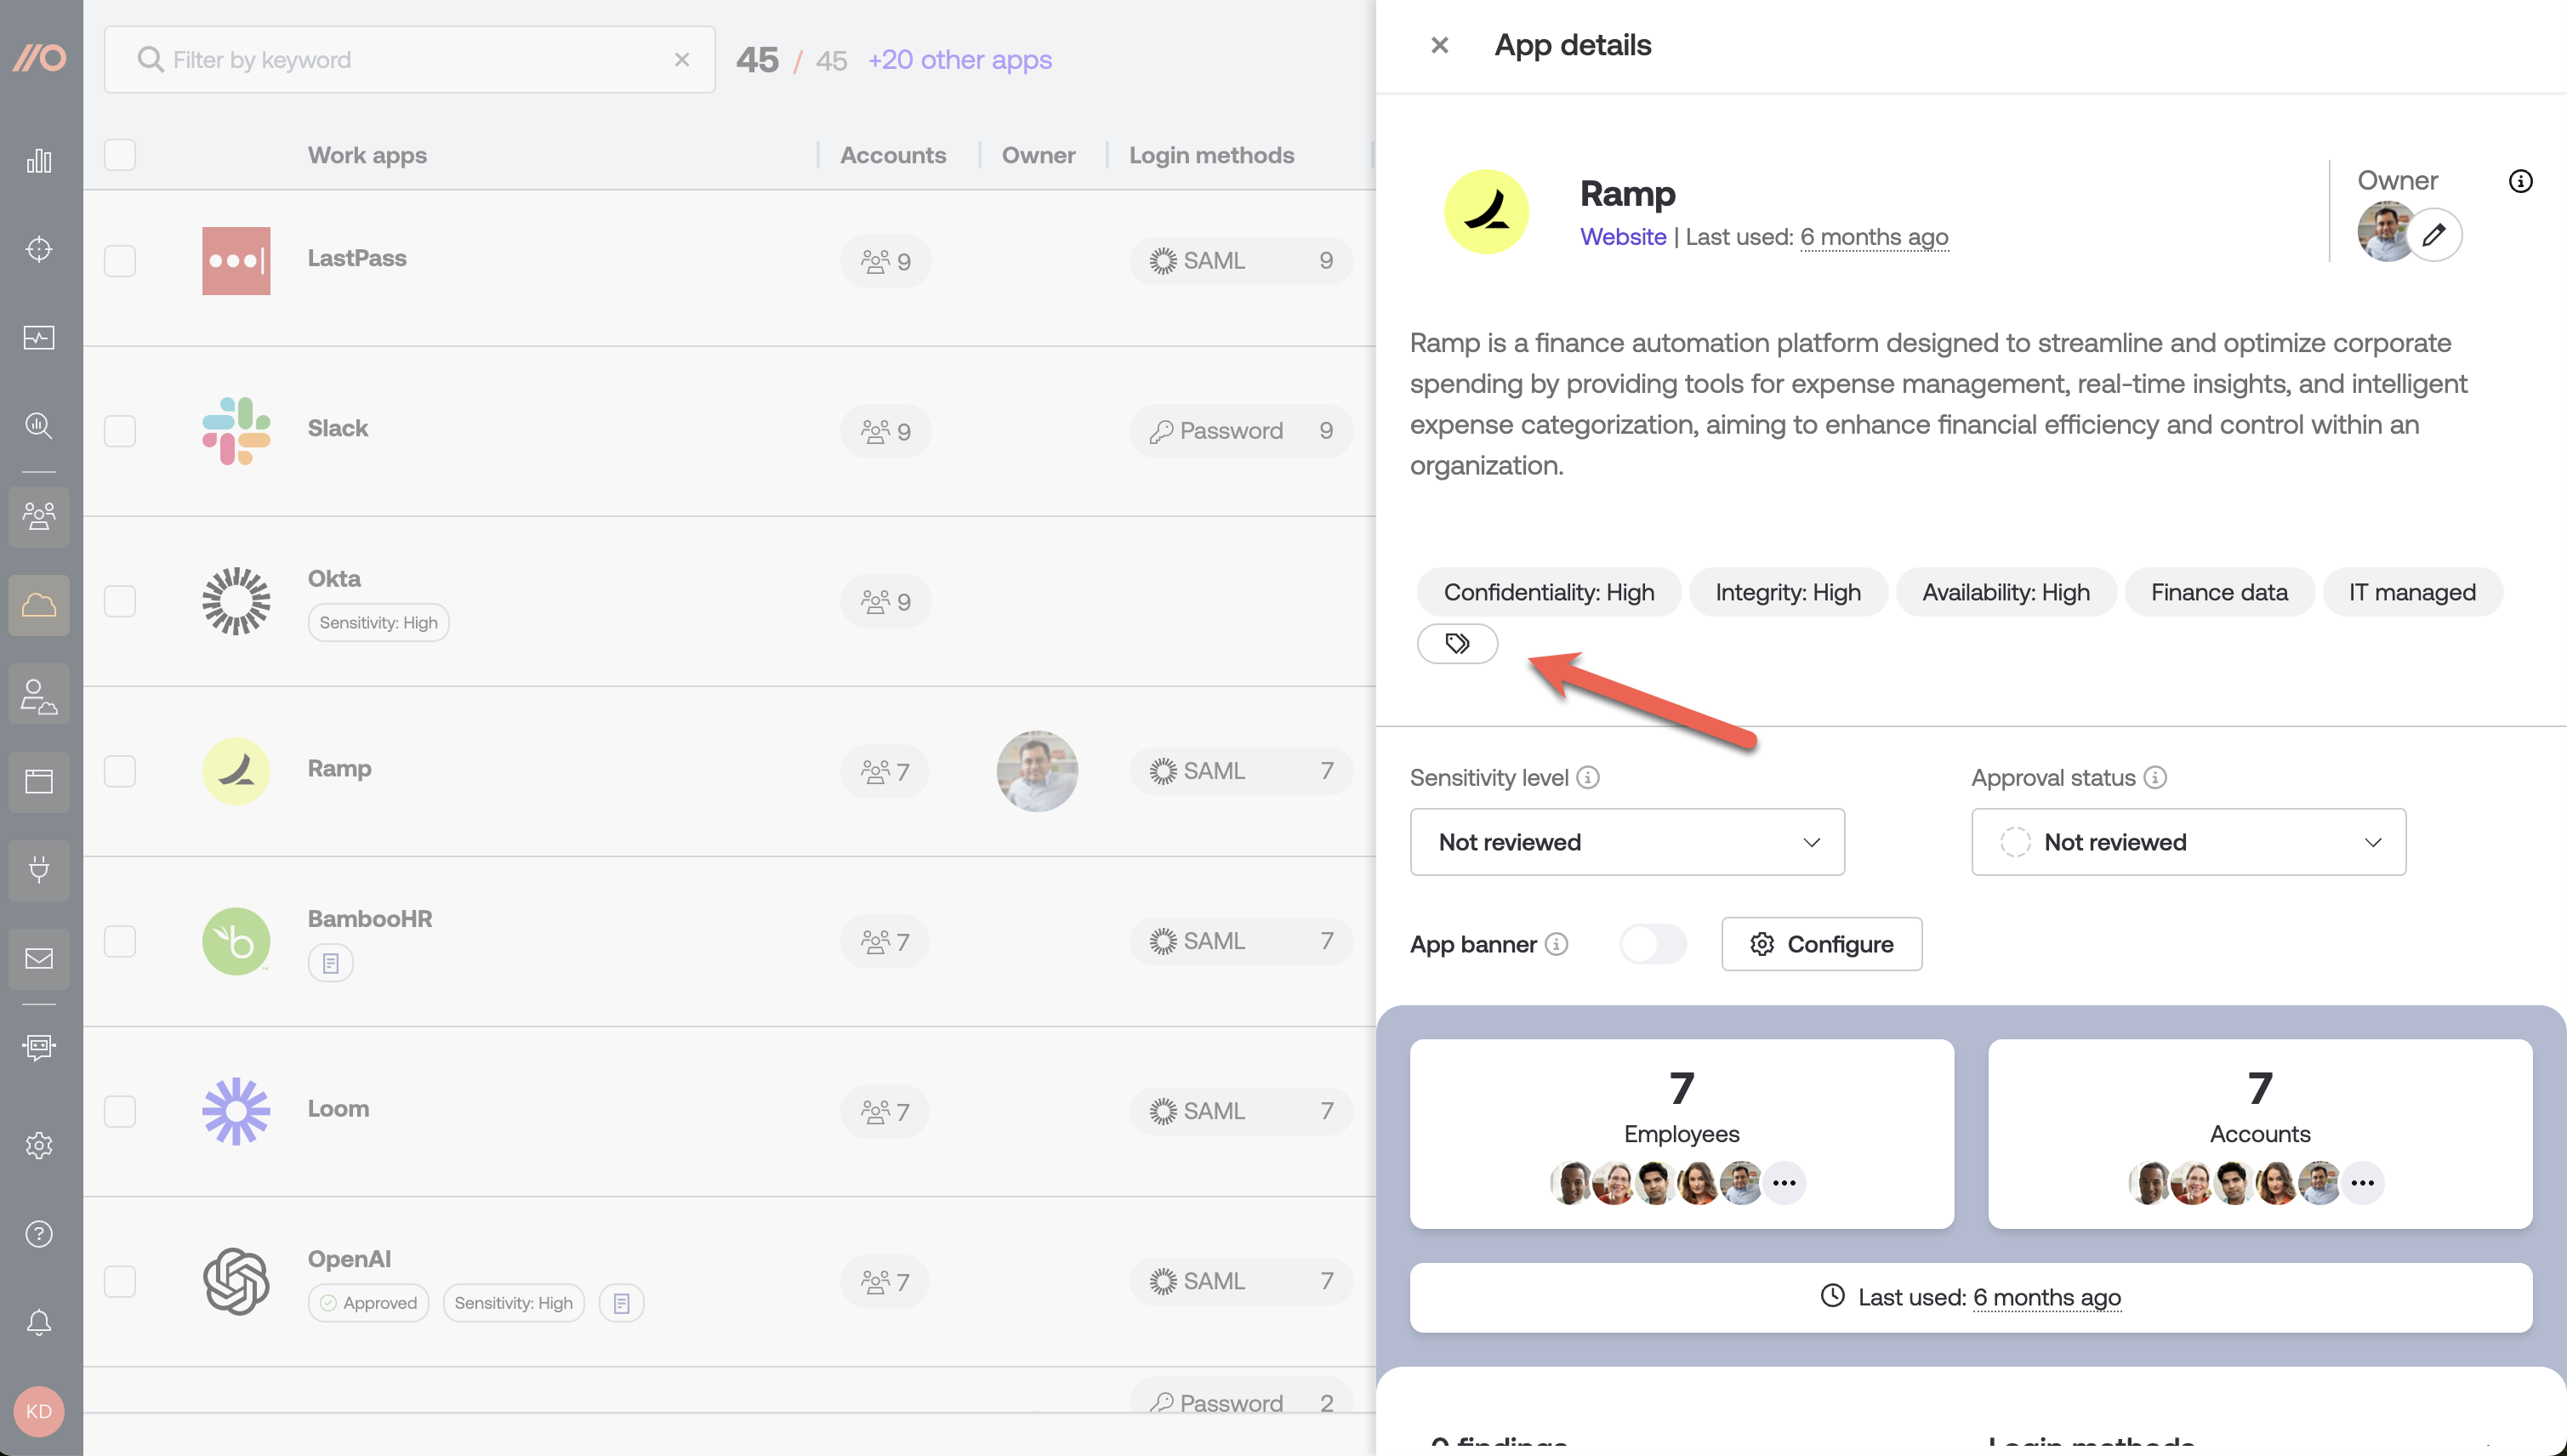
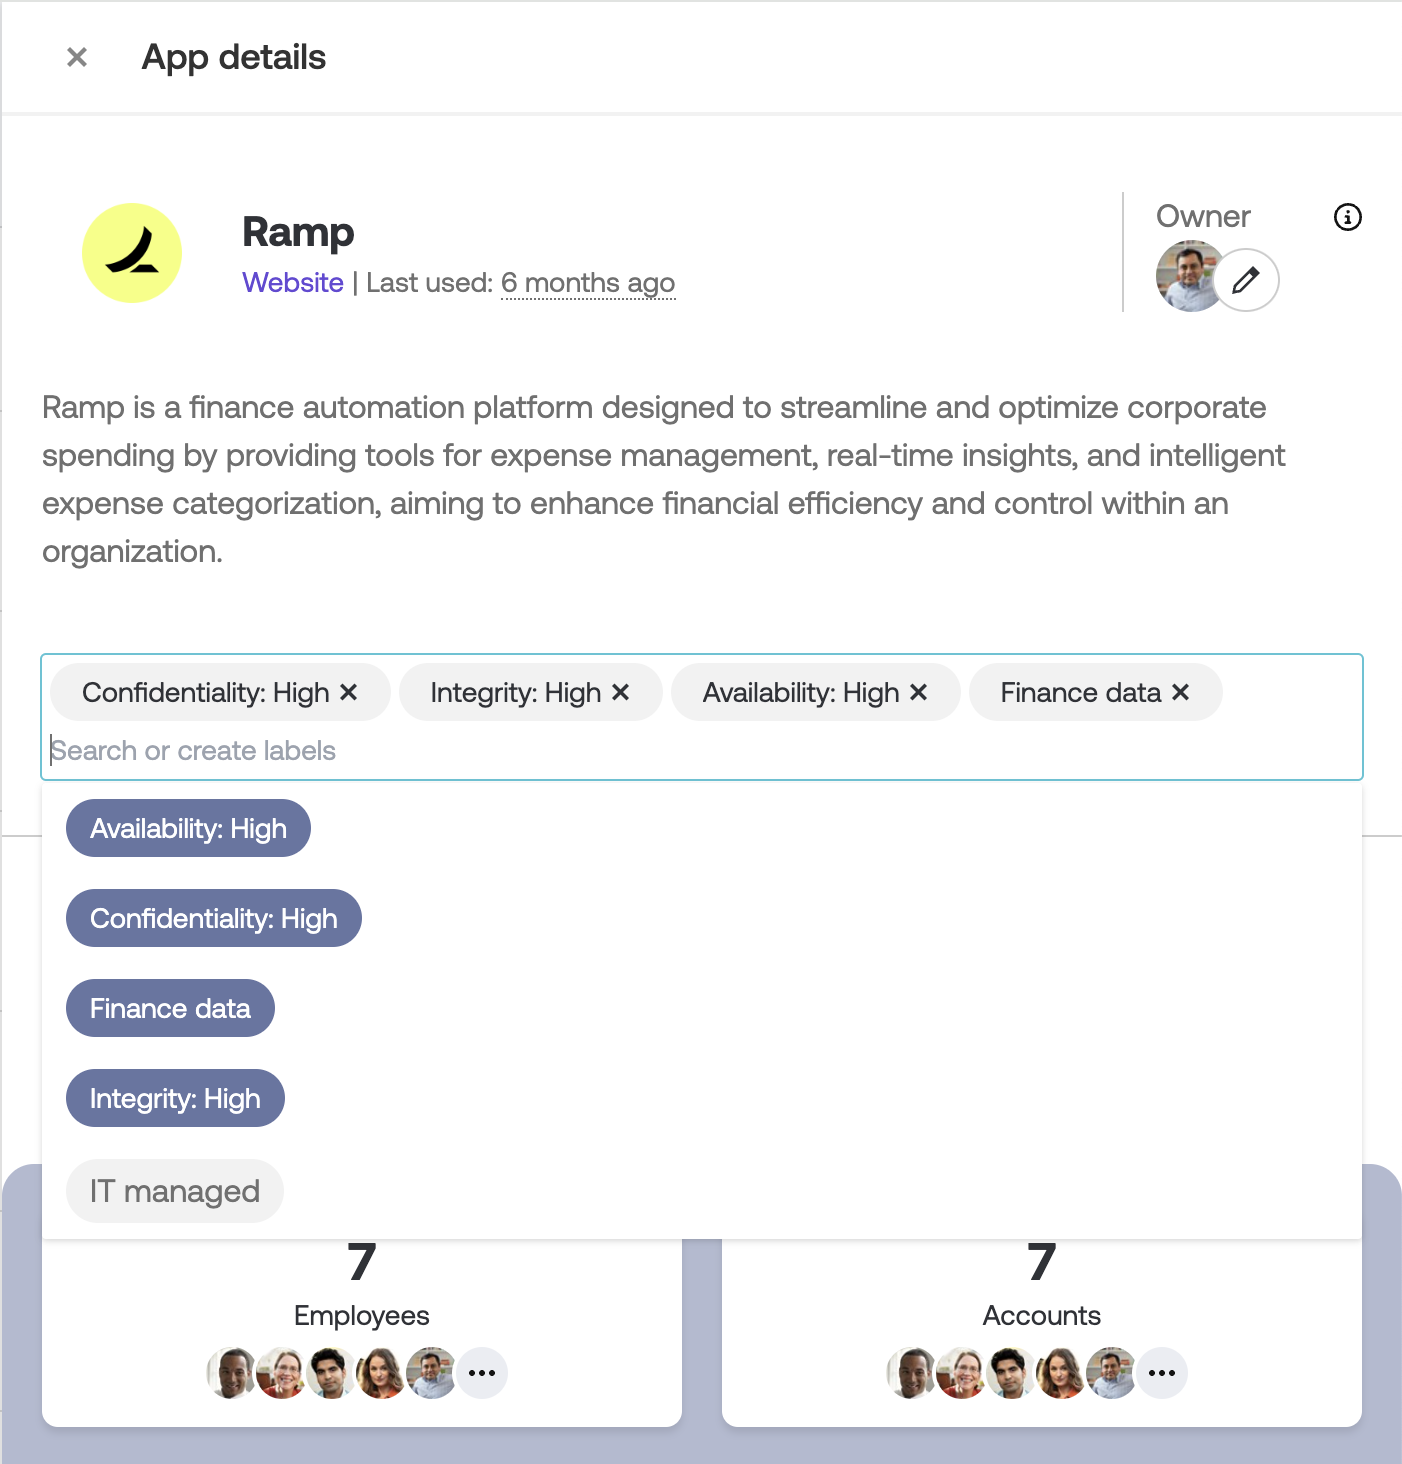
You can add new labels or re-use existing ones by selecting them from the dropdown.
Or, from the main Apps list, check the box next to a group of apps and use the Bulk actions dropdown to add labels to multiple apps by selecting Add labels.
View accounts
Use the Accounts page to get a complete understanding of all the accounts that exist in your environment, including employees who may have multiple accounts on the same app, and how they are accessing an app (password, OIDC, SAML, Okta SWA).
You can also find security issues with employee accounts, such as leaked, weak and reused passwords or shared credentials, and identify whether accounts are protected by multi-factor authentication (MFA).
Prerequisites: In order to see complete MFA data, you must complete an API integration with your work platform (Microsoft 365, Google Workspace or Okta). In order to see password security data, you must enroll employee browsers using the Push browser extension.
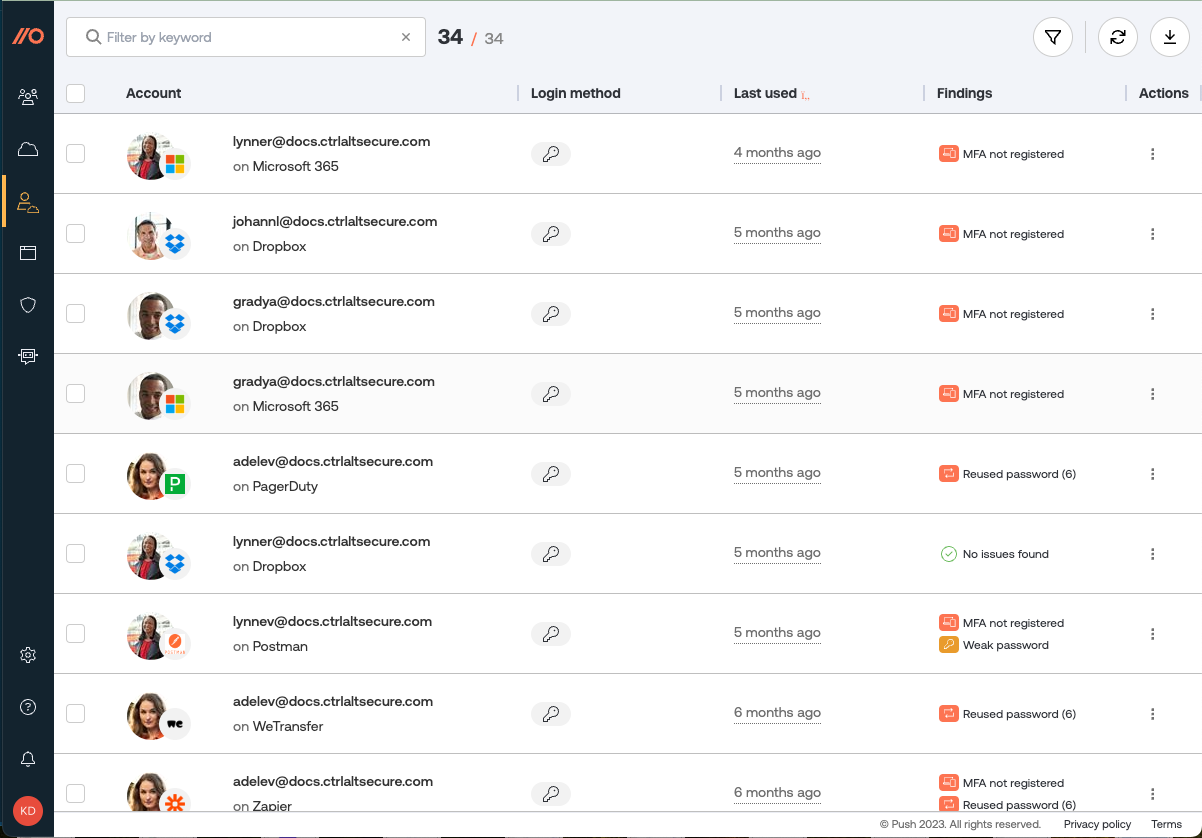
On this page, you can view the following details:
Whether a password has been leaked, reused, or is weak (easily guessable).
Whether a password contains words found in a custom restricted word list.
Whether employees are sharing account credentials.
Whether the account is using a password manager, and which one.
The login method for a given account (password, OIDC, SAML or Okta SWA).
When an account for a specific SaaS app and employee was last used.
Whether the employee has registered for MFA on their primary work account (Google or Microsoft) as well as certain popular SaaS apps, and what authentication methods they use for MFA.
Ability to filter by login method, identity provider, last used, password manager usage, findings, used by, app sensitivity level and approval status, and apps.
When observing a SAML login, Push can recognize the following providers:
Okta
Google Workspace
Microsoft 365
JumpCloud
Duo Security
Ping Identity
SAP
IBM Security Access Manager
Removing account data
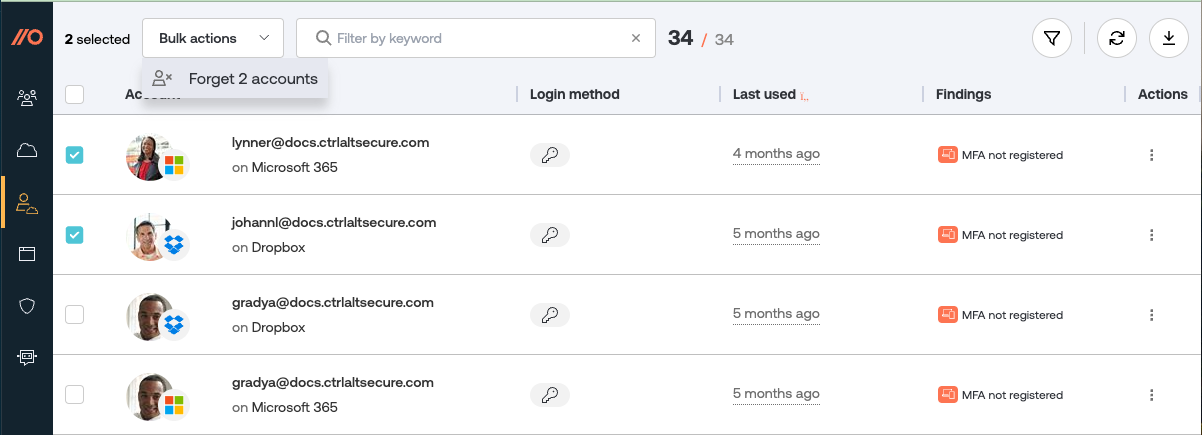
If you need to do any cleanup of your account inventory (or to help with employee offboarding), you can select accounts you wish to forget. Forgetting an account will remove that data from Push, but does not impact the employee record itself.
Go to the Actions column on the Accounts page and select Forget account, or use the checkboxes and Bulk actions to remove account data.
Resolving shared account findings
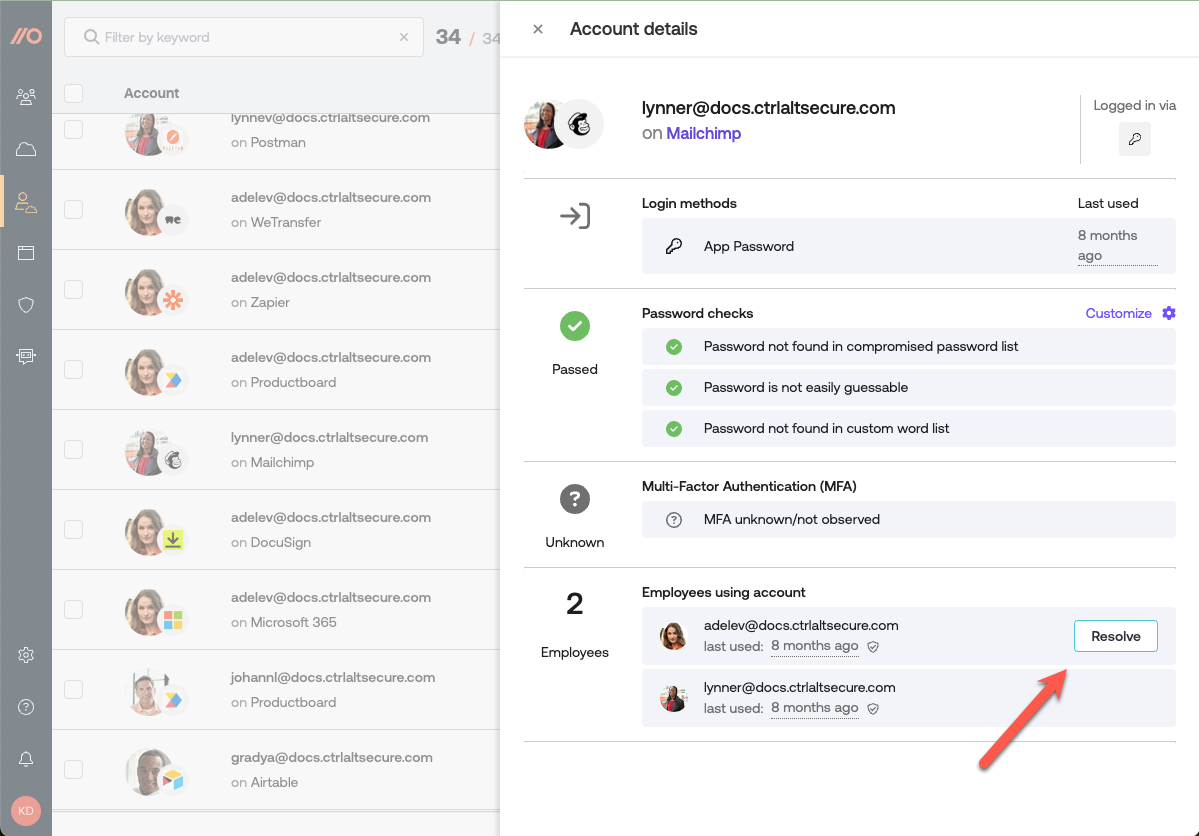
If you know that employees are no longer sharing credentials for a specific account, you can manually resolve the shared account finding. Push does not have a way to detect when a shared account is no longer being shared.
To resolve a shared account, open the account details pane and click Resolve in the Employees using account section. Note: If Push sees the account get shared again, a new finding will appear.
Understanding MFA data in Push
The Accounts page reflects whether an employee has registered for MFA. With most platforms, users who register for MFA start getting prompted for MFA. However, with some platforms, such as Microsoft 365, users can register for MFA but an administrator still needs to enforce it before the user will be prompted. Refer to our blog post for some ideas on enforcing MFA with M365.
View browser extensions
View the browser extensions installed on employee browsers using the Browser extensions page at Investigate > Browser extensions.
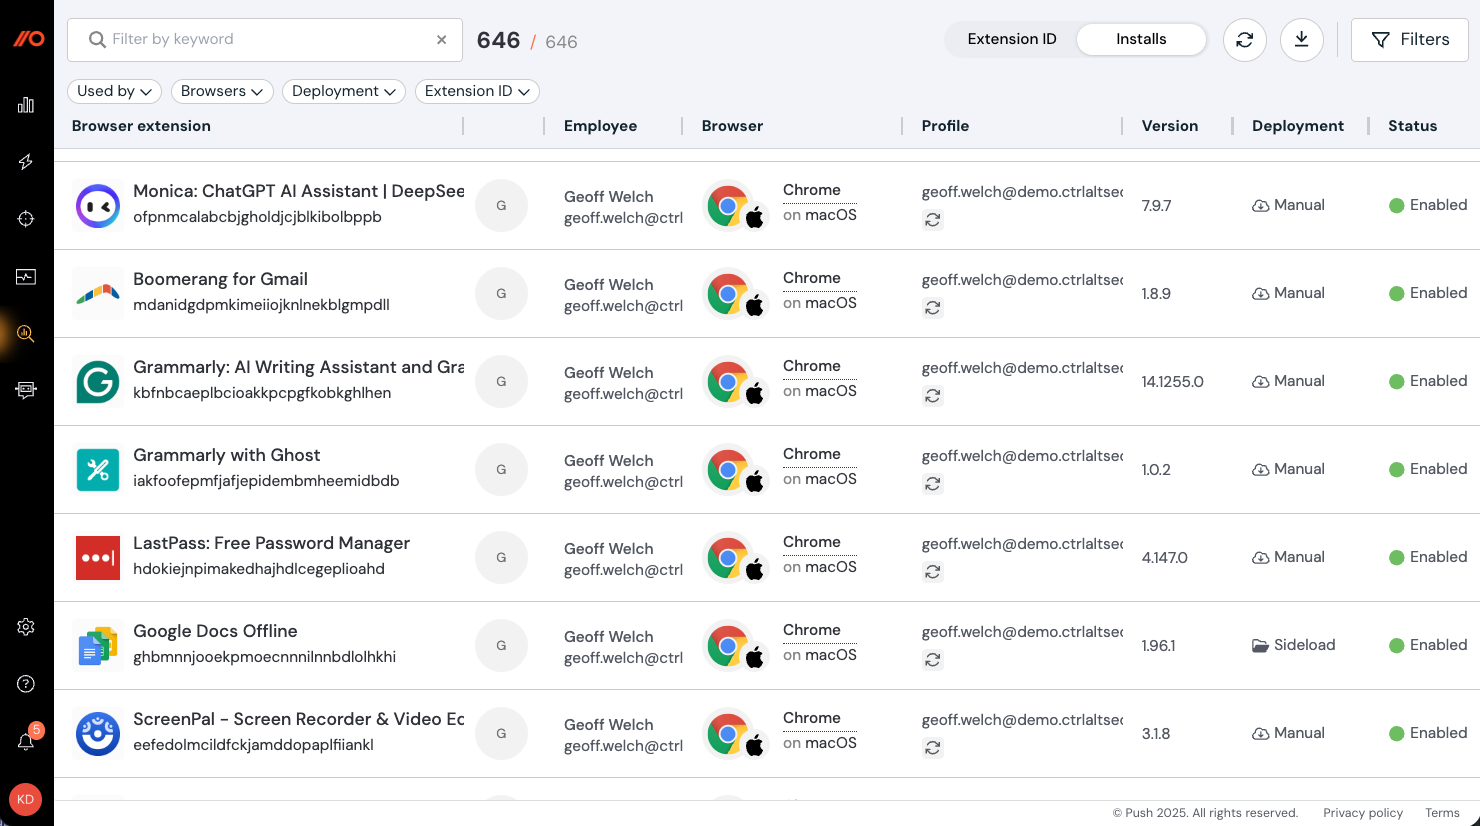
On this page, you can view the following details:
Extension name
Extension ID
Version number
Update URL (Note: This data type is not supported in Firefox.)
Homepage URL
Extension permissions
Host permissions (where applicable)
Deployment method (managed, manual, sideloaded or development)
Which employees use the extension
Which browsers have the extension installed
Whether the extension is enabled or disabled
Push can observe installed extensions for the following browsers:
Google Chrome
Microsoft Edge
Firefox
Brave
Opera
Arc
Island
Safari does not support this Push feature.
Note: To enable browser extension visibility, go to Settings > Organization > Browser extension visibility in the admin console.
View third-party integrations
Review which third-party OAuth integrations users in your environment have consented to using the OAuth apps page in the left sidebar at Investigate > OAuth apps.
Prerequisites: In order to see third-party integrations, you must complete an API integration with your work platform. The Push browser extension also observes social logins (e.g. "Log in with Microsoft" or "Log in with Google").
Insight into the third-party integrations in your environment is important for addressing risks like consent phishing, and identifying undesired privileged access granted to potentially malicious third parties.
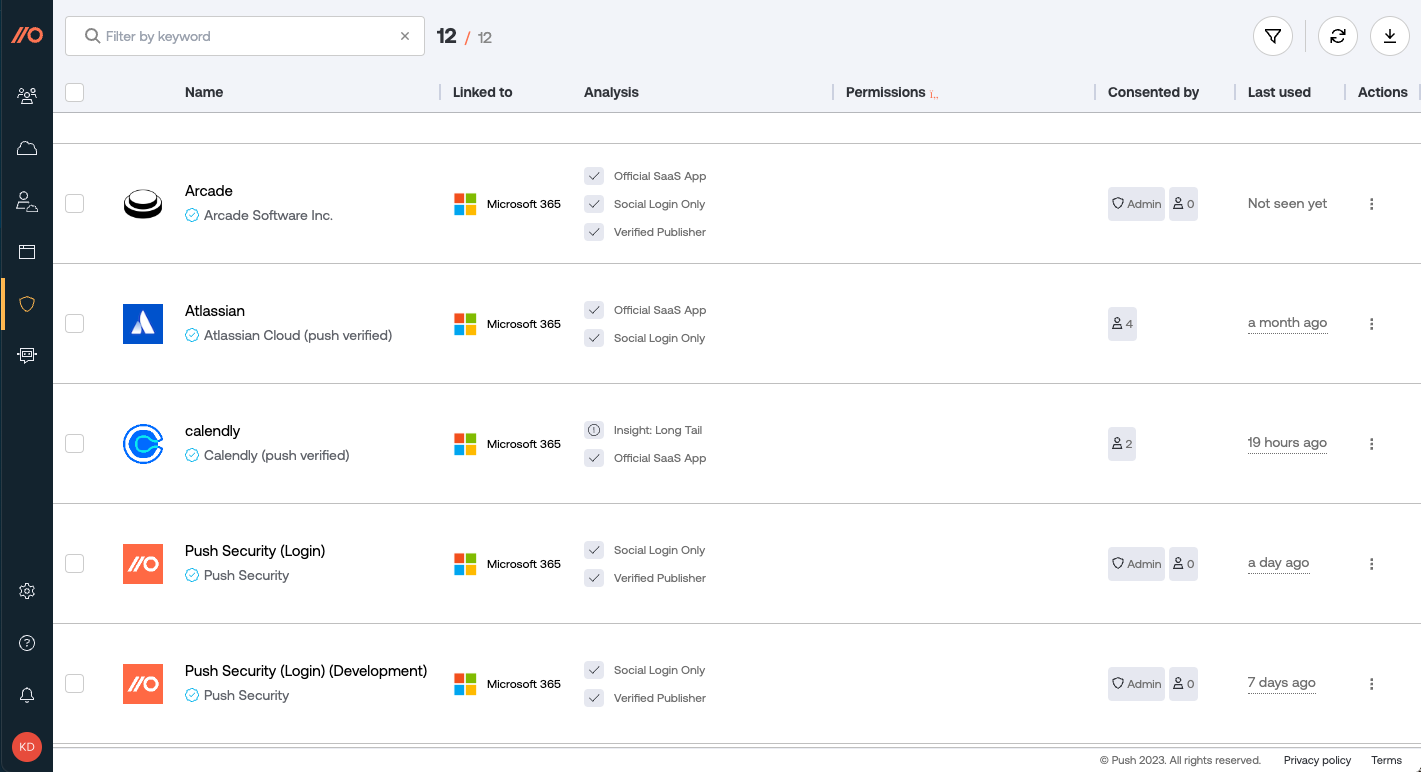
On this page, you can view the following details:
A list of all the third-party OAuth integrations discovered in your organization.
Which platform an integration is linked to.
Details about each integration's risk characteristics.
How many users have consented to an integration and whether an admin has consented to an integration.
What permissions an integration has been granted.
Whether the app is verified by Google, Microsoft, or the Push team, or has not been verified.
When an integration was last used. Note that data for integration usage is collected at the time you complete an API integration. We don’t backfill usage data.
The risk characteristics that Push provides are:
User Delegated High-Risk Assets: Whether user-delegated permissions exist for high-risk assets such as email, calendar, and contacts.
Exposes Some Data For All Users: Whether the app exposes some data for all users.
Long Tail: Whether the app has a “long tail,” meaning it has permissions beyond a simple social login and is used by fewer than 3 users.
Social Login Only: Whether an app is used solely for social login.
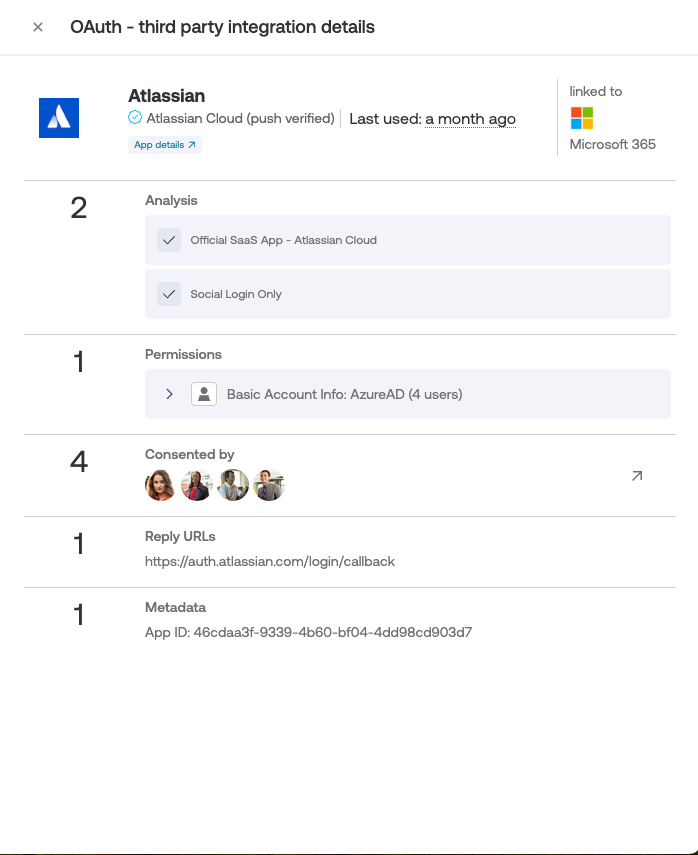
Click on an integration to view more details:
What permissions the application has, and for how many users. Click on a permission to view the exact scope that a user has delegated.
Which specific users have consented to the integration.
Its reply URLs.
Its app ID.
Delete third-party integrations
If you identify an OAuth app that is unused, unwanted, or otherwise problematic, you can remove it using the Push platform.
There are two ways to remove an OAuth app:
From the Push admin console
From a ChatOps channel message
For guidance on how to triage a problematic integration, refer to this Push blog post.
Deleting integrations from the admin console
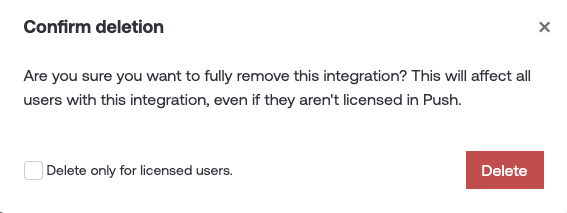
To remove an integration from the admin console, go to Investigate > OAuth apps and then identify the integrations you wish to remove. Then use the Bulk actions > Delete integrations option to remove the selected integrations. You can also remove individual integrations by clicking on the three dots at the end of each row and selecting Delete integration.
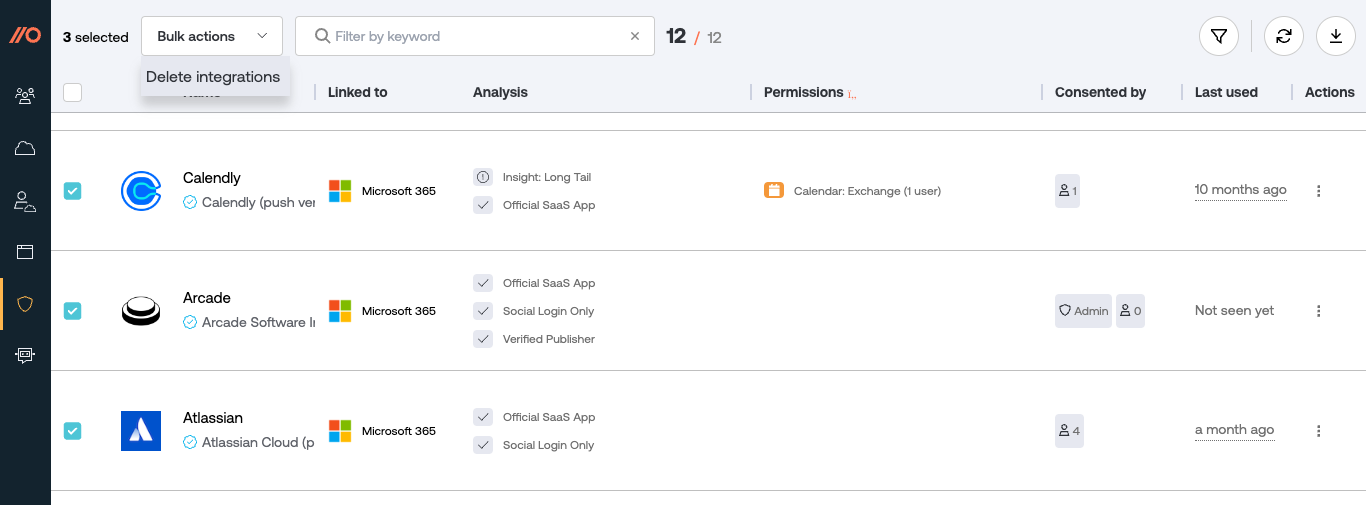
You’ll have the option to delete the integrations for all applicable users in the Google Workspace or Microsoft 365 instance integrated with Push, or only those users who are assigned a license on the Push platform.
Deleting integrations from a ChatOps message
You can delete integrations directly from a ChatOps message if you enable the ChatOps topic for SaaS notifications so that your security team can receive messages in your specified team channel.
Find suspicious mail rules
Attackers often use malicious mail forwarding rules to retain access to sensitive email once they have successfully phished an employee. Use Push to review externally forwarding mail rules and verify whether a rule has been created by the employee or a malicious third party.
Prerequisites: In order to find suspicious mail rules, you must complete an API integration with your work platform.
As soon as you complete an API integration with your work platform, Push scans employee inboxes for mail rules that forward to external domains and lists the results on the Mail rules page, available under Investigate in the left sidebar of the Push admin console.
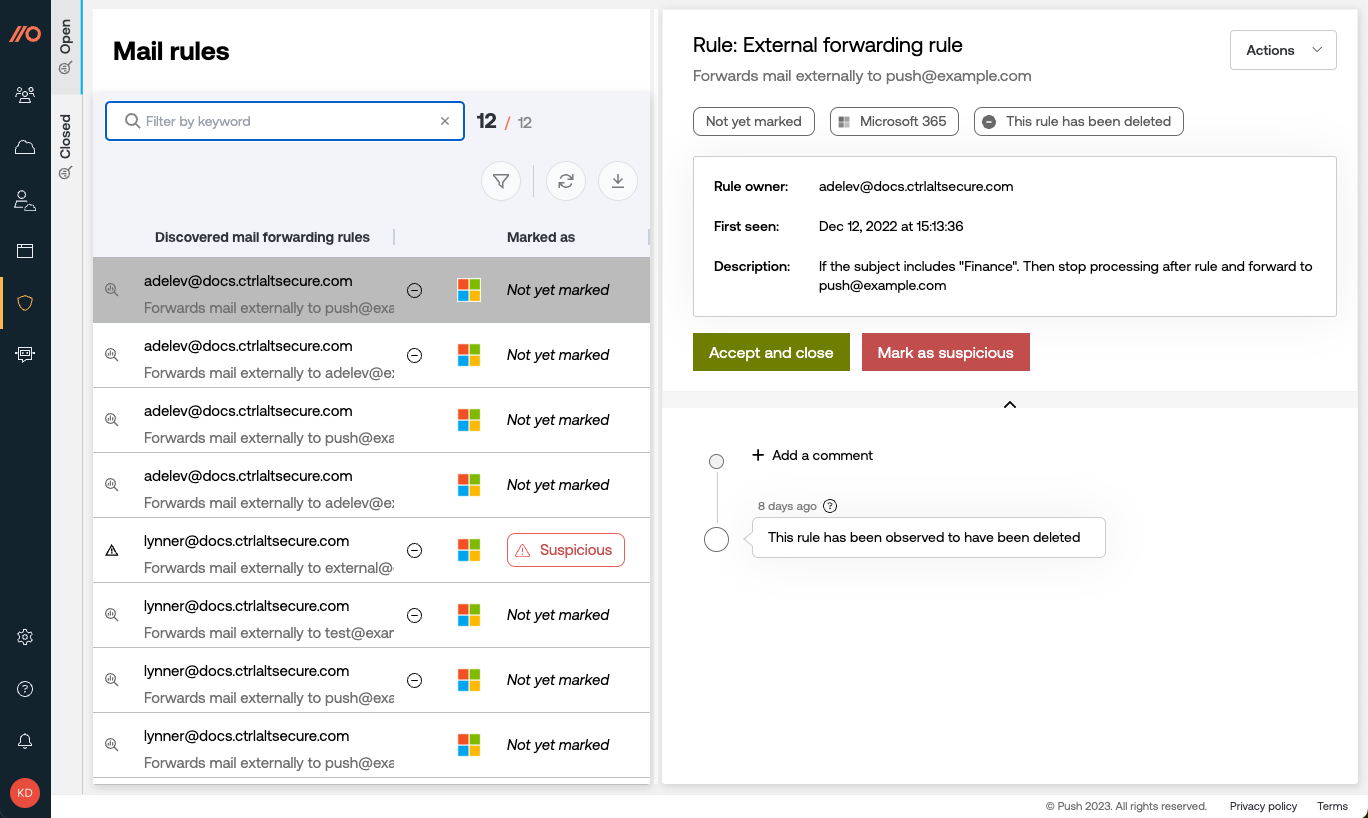
The left panel of the screen shows discovered mail forwarding rules, including whether they’ve been triaged yet and whether the rules are still in use. Click on a rule to see more details about it:
The name of the rule.
The external email address it forwards to.
Which platform it appears on (Google or Microsoft).
The rule owner.
When the rule was first seen by Push.
What the rule is configured to do.
A timeline of activity associated with the rule.
From the right panel, you can accept the rule and close the alert in Push, or mark it as suspicious. Push will automatically disable mail rules you mark as suspicious if they were created in Microsoft 365. Google Workspace does not support disabling mail rules.
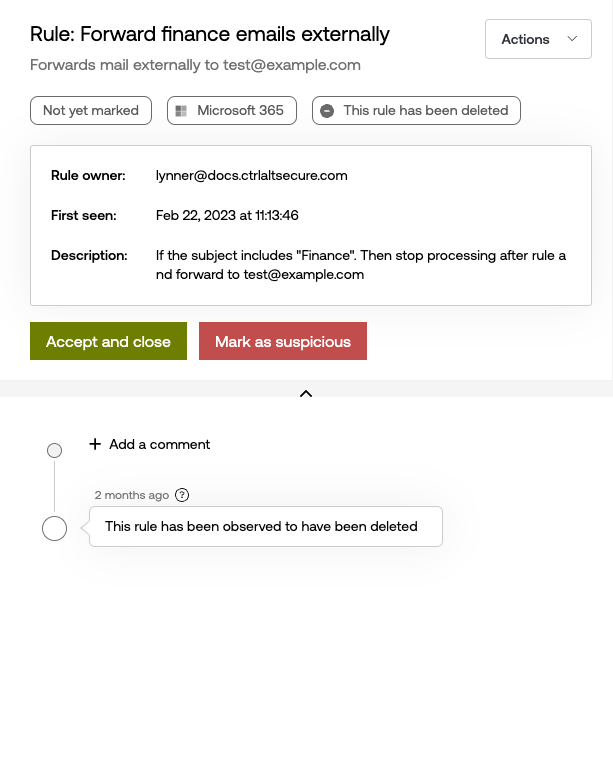
You can use the ChatOps workflow for suspicious mail rules to automate outreach to employees to ask if they created a rule. ChatOps also allows your security team to receive messages if an employee marks a mail rule as suspicious so they can respond right away. See the ChatOps topic for suspicious mail rules for more information.
Curious about whether you should just disable external email forwarding for your organization? Check out our blog post for Push’s point of view.