
This is the first blog in a short series we’re putting together about the ‘why’ behind the ‘what’ at Push. This entry is focused on threat detection: Let’s get started.
This is the first blog in a short series we’re putting together about the ‘why’ behind the ‘what’ at Push. This entry is focused on threat detection: Let’s get started.
The field of threat detection and security monitoring has changed significantly over the last decade. Security tools and product categories have been added and replaced, specialist disciplines established, and methodologies created.
Naturally, defenders have had to mature their approach because of the changing nature of the threat facing organizations. Attackers have always looked for new ways to target their victims, and naturally, defenders have had to adapt, forcing attackers to change things up… it’s a cat and mouse game.
Blue teamers have used the concept of the Pyramid of Pain for over a decade. The logic is simple: Focus on detecting and responding to indicators that are hard for attackers to change.
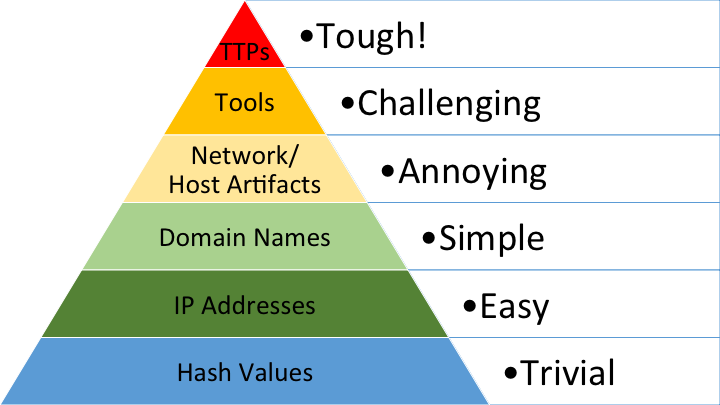
If an attacker only has to tweak a variable to get around your detection rule, like adding a space to change a hash value, it’s probably not a very good detection. It’s not going to remain effective for long and you’re always going to be one step behind the attacker – waiting for them to make their next move so you can react. This usually ends up meaning that attackers enjoy at least some success before they can be shut out again.
The Pyramid of Pain – and the goal of implementing hard-to-bypass detections that hit attackers where it hurts – is central to our design philosophy. But before we get into how we apply this approach, and the types of controls we’ve created as a result, it’s useful to look at how IT and security have changed since the Pyramid was created more than a decade ago.
A new era for cyber security
We’ve spoken a lot about how we’re in the midst of a new era in cybersecurity, in which identity is now the outermost digital perimeter for security teams to defend. (You’ll be familiar with this if you’ve seen any of Luke’s talks on the New SaaS Cyber Kill Chain.)
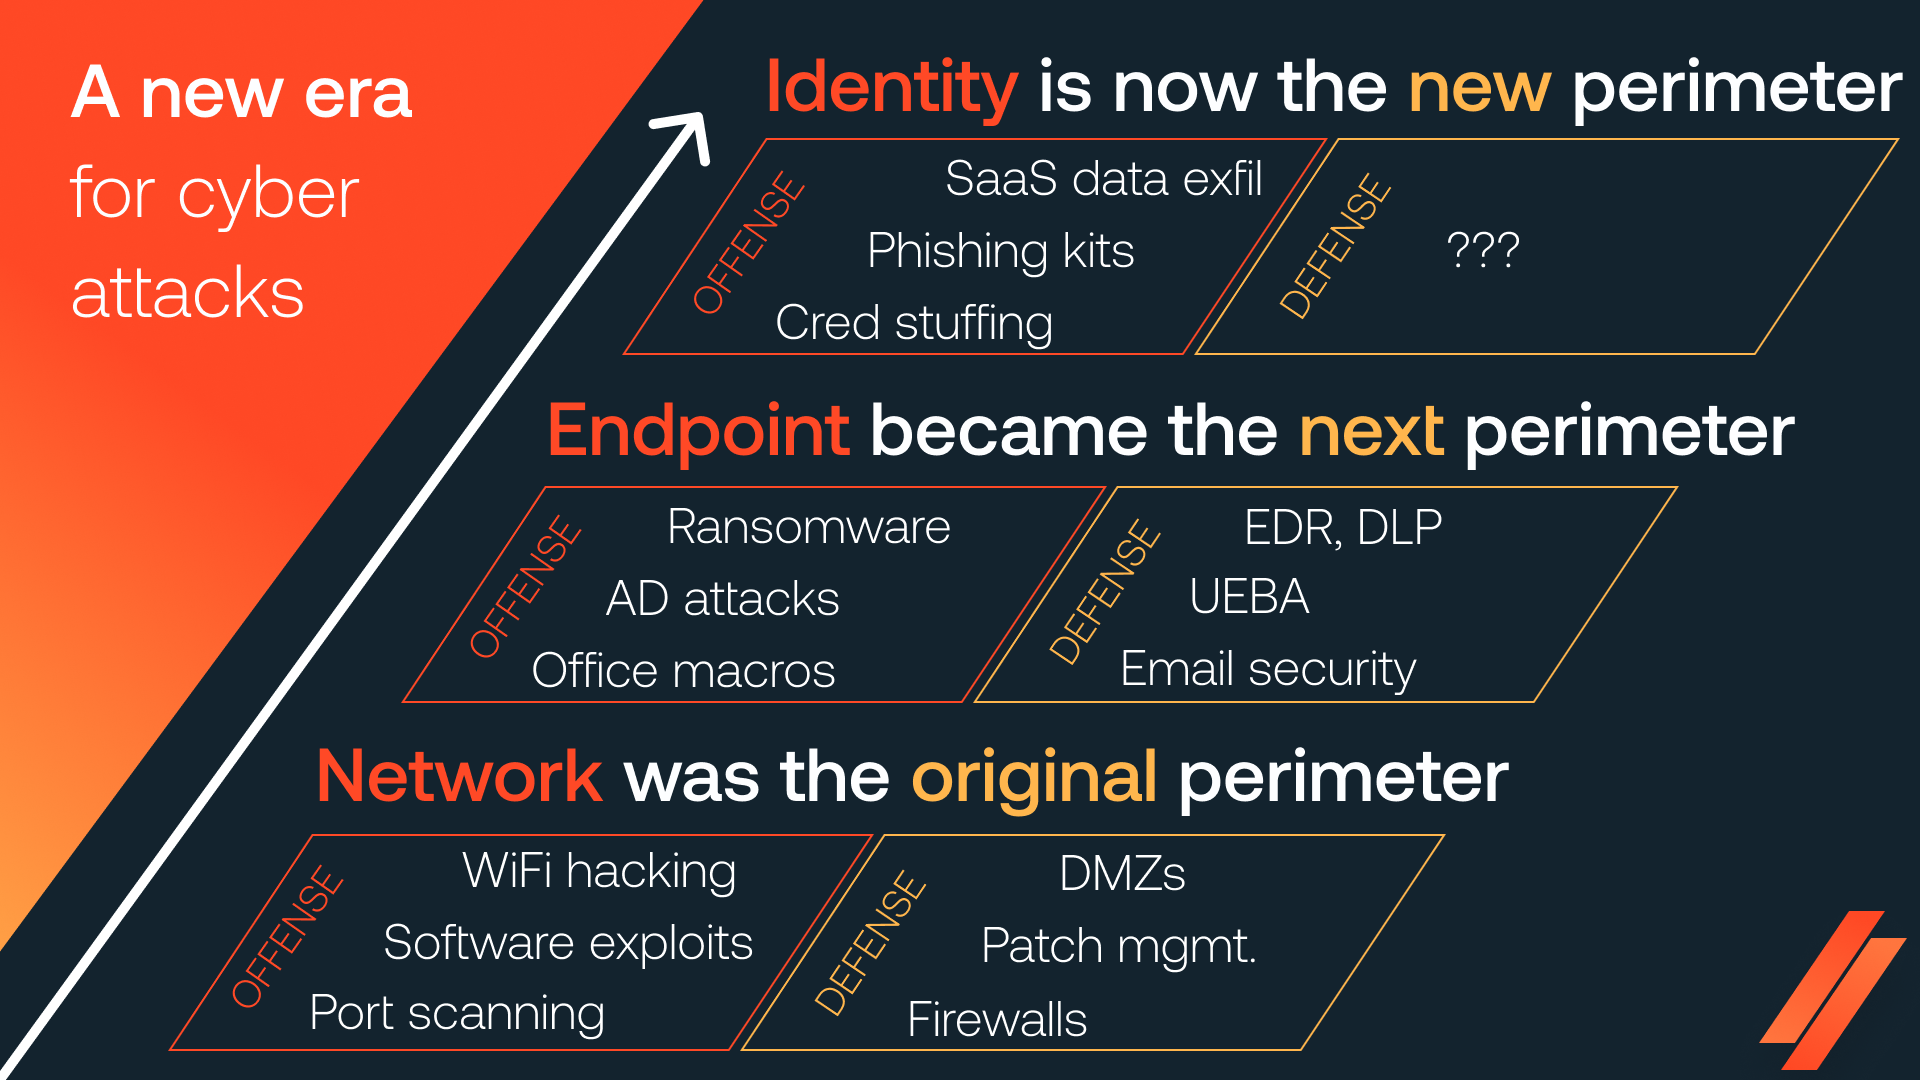
This is primarily because modern working is no longer contained to a heavily centralized corporate network, and instead happens primarily in applications accessed over the internet via web browser.
In this new world, attacks don’t even have to touch the old perimeters, because all the data and functionality they could want exists on the public internet. As a result, we’re seeing more and more attacks targeting SaaS apps, with the entire attack chain being concluded outside customer networks, not touching any traditional endpoints or networks. The recent attacks on Snowflake customers, hailed one of the biggest breaches in history, demonstrate this risk all too well.
This creates a problem for security teams looking to detect and respond to these attacks.
Attacks today are shorter and faster, but just as dangerous
Detecting and responding to identity attacks – phishing, credential stuffing, etc. – used to be just one possible method of initial access in quite a lengthy Kill Chain that stretched from the compromise of the user device, pivoting to internal network resources, escalating privileges, moving laterally, and finally achieving their objectives.
This meant that defenders could adopt an assumed compromise mentality and build layered detections, as well as proactively hunting for threats across these various stages and layers of the network. The more actions an attacker has to perform, the more opportunities for detection, and the higher the likelihood that they’ll be caught in the act before any real, lasting damage can be caused.
Today, attackers have a lot of opportunities to cause significant damage for much less effort than before. For example, if the goal is to compromise an app like Snowflake and dump the data from it, the Kill Chain is way shorter than a traditional network-based attack. And all the great tools and security products you have, like EDR, don’t come into play.
This means that the initial layer of anti-account takeover controls are much more important in this context. But, the historical detections in this space – email gateway security products, analyzing web pages for malicious content, and URL blocklisting – are either less relevant, or built upon easy to bypass detections toward the bottom of the Pyramid of Pain.
As an example, we recently published an article on all the ways that AitM phishing sites are evading detection. TL;DR – there are a lot, and they seem to be quite effective. But this is partly because the majority of the detections they're trying to avoid are built on shaky ground.
So what? Well, it’s clear that the controls that the industry has relied on in the past to stop identity attacks are too easy to bypass, and are no longer sufficient.
Building effective identity threat detection controls
Now we’ve covered the problem that we set out to solve, let’s look at what we’re doing differently.
In order to climb the Pyramid toward the apex, you need to find ways to detect increasingly generic parts of an attack technique. So you want to avoid things like what a specific malware’s code looks like, or where it connects back to. But what the malware does, or what happens when it runs, is more generic, and therefore more interesting to us.
The shift from static code signatures and fuzzy hashes to dynamic analysis of what code does on a live system is at the heart of why EDR killed antivirus a decade ago. It proved at-scale the value of moving detections up the pyramid.
We’re always on the lookout for ways to move our detections up the pyramid as well. It’s easiest to explain how we’ve applied this by looking at an example.
Scenario: Detecting a web-based phishing attack
Let’s break down the stages of a web-based phishing attack as an example. For a user to be successfully phished:
Stage 1: The victim must be lured to visit a website.
Stage 2: The website must somehow trick or convince the user that it’s legitimate and trustworthy, for example by mimicking a legitimate site.
Stage 3: The user must enter their actual credentials into that website.
So, how might you go about detecting this attack? Let’s start from the bottom of the pyramid and work our way up.
Stage 1: Determining if a URL, IP, or domain is bad
You might start by looking for the lure – historically an email. You could look for links in emails, or links in attachments in an email and then check if they are bad (which is essentially what email security products do). You could look for known-bad URLs in emails, but these change for every phishing campaign. In modern attacks, every target can receive a unique email and link. Even just using a URL shortener can bypass this. It’s equivalent to a malware hash – trivial to change, and therefore not a great thing to pin your detections on.
You could look at which IP address the user connects to, but these days it’s very simple for attackers to add a new IP to their cloud-hosted server. If a domain is flagged as known-bad, the attacker only has to register a new domain, or compromise a WordPress server on an already trusted domain. Both of these things are happening on a massive scale as attackers pre-plan for the fact that their domains will be burned at some point. Attackers are more than happy to spend $10-$20 per new domain in the grand scheme of the potential proceeds of crime.
But there’s a more fundamental flaw here – for defenders to know that a URL, IP, or domain name is bad, it needs to be reported first. When are things reported? Typically after being used in an attack – so unfortunately, someone always gets hurt.
Stage 2: Determining if a site is legitimate
So how can we detect a phishing website, on day-zero, the first time anyone runs into it? Well we can look at the second step – does the URL resemble a real website, does the HTML code for a page look similar to a legitimate login page for a known website, is it loading the same image files? This is not trivial to detect, but with the right fuzzy matches and image analysis it can be automated.
We’ve now moved up a level on the Pyramid – we’re detecting website artifacts. If we see a legitimate looking website on an unknown domain, it’s likely to be a malicious clone.
Unfortunately, the attacker’s website doesn’t need to send each visitor to the same website. It can change dynamically based on where the visitor is coming from – or even randomly, so that not all visitors are served the phishing page. This means that tools which resolve where the links in emails go to be able to analyze them (such as email security appliances) don’t necessarily see the same site the user is actually visiting – a fact that is commonly abused by attackers to bypass detection. It’s critical that detection happens on the actual web page that the victim sees.
Stage 3: Detecting the user entering their credentials
For a phishing attack to succeed, the victim must enter their actual credentials into the webpage. If you can stop the user entering their real password, there’s no attack. There’s no getting around it.
So, this is exactly what we did: Earlier this year, we released a control which stops users from entering their password belonging to a particular login page anywhere else.
Seems simple, right? By focusing on this generic action, that always has to happen, you can essentially stop your users being phished altogether. This means, it doesn’t matter what the attacker does before that point:
It doesn't matter if they run the site using Cloudflare Workers to block automatic analysis.
It doesn’t matter if they hack a WordPress blog to get a reputable domain.
It doesn’t matter if they use clever redirects and rotate the URLs delivered to the user.
It doesn’t matter if they randomize the HTML title for the web page.
They can’t avoid the fact that a user is required to enter their credentials on the page for the attack to succeed.
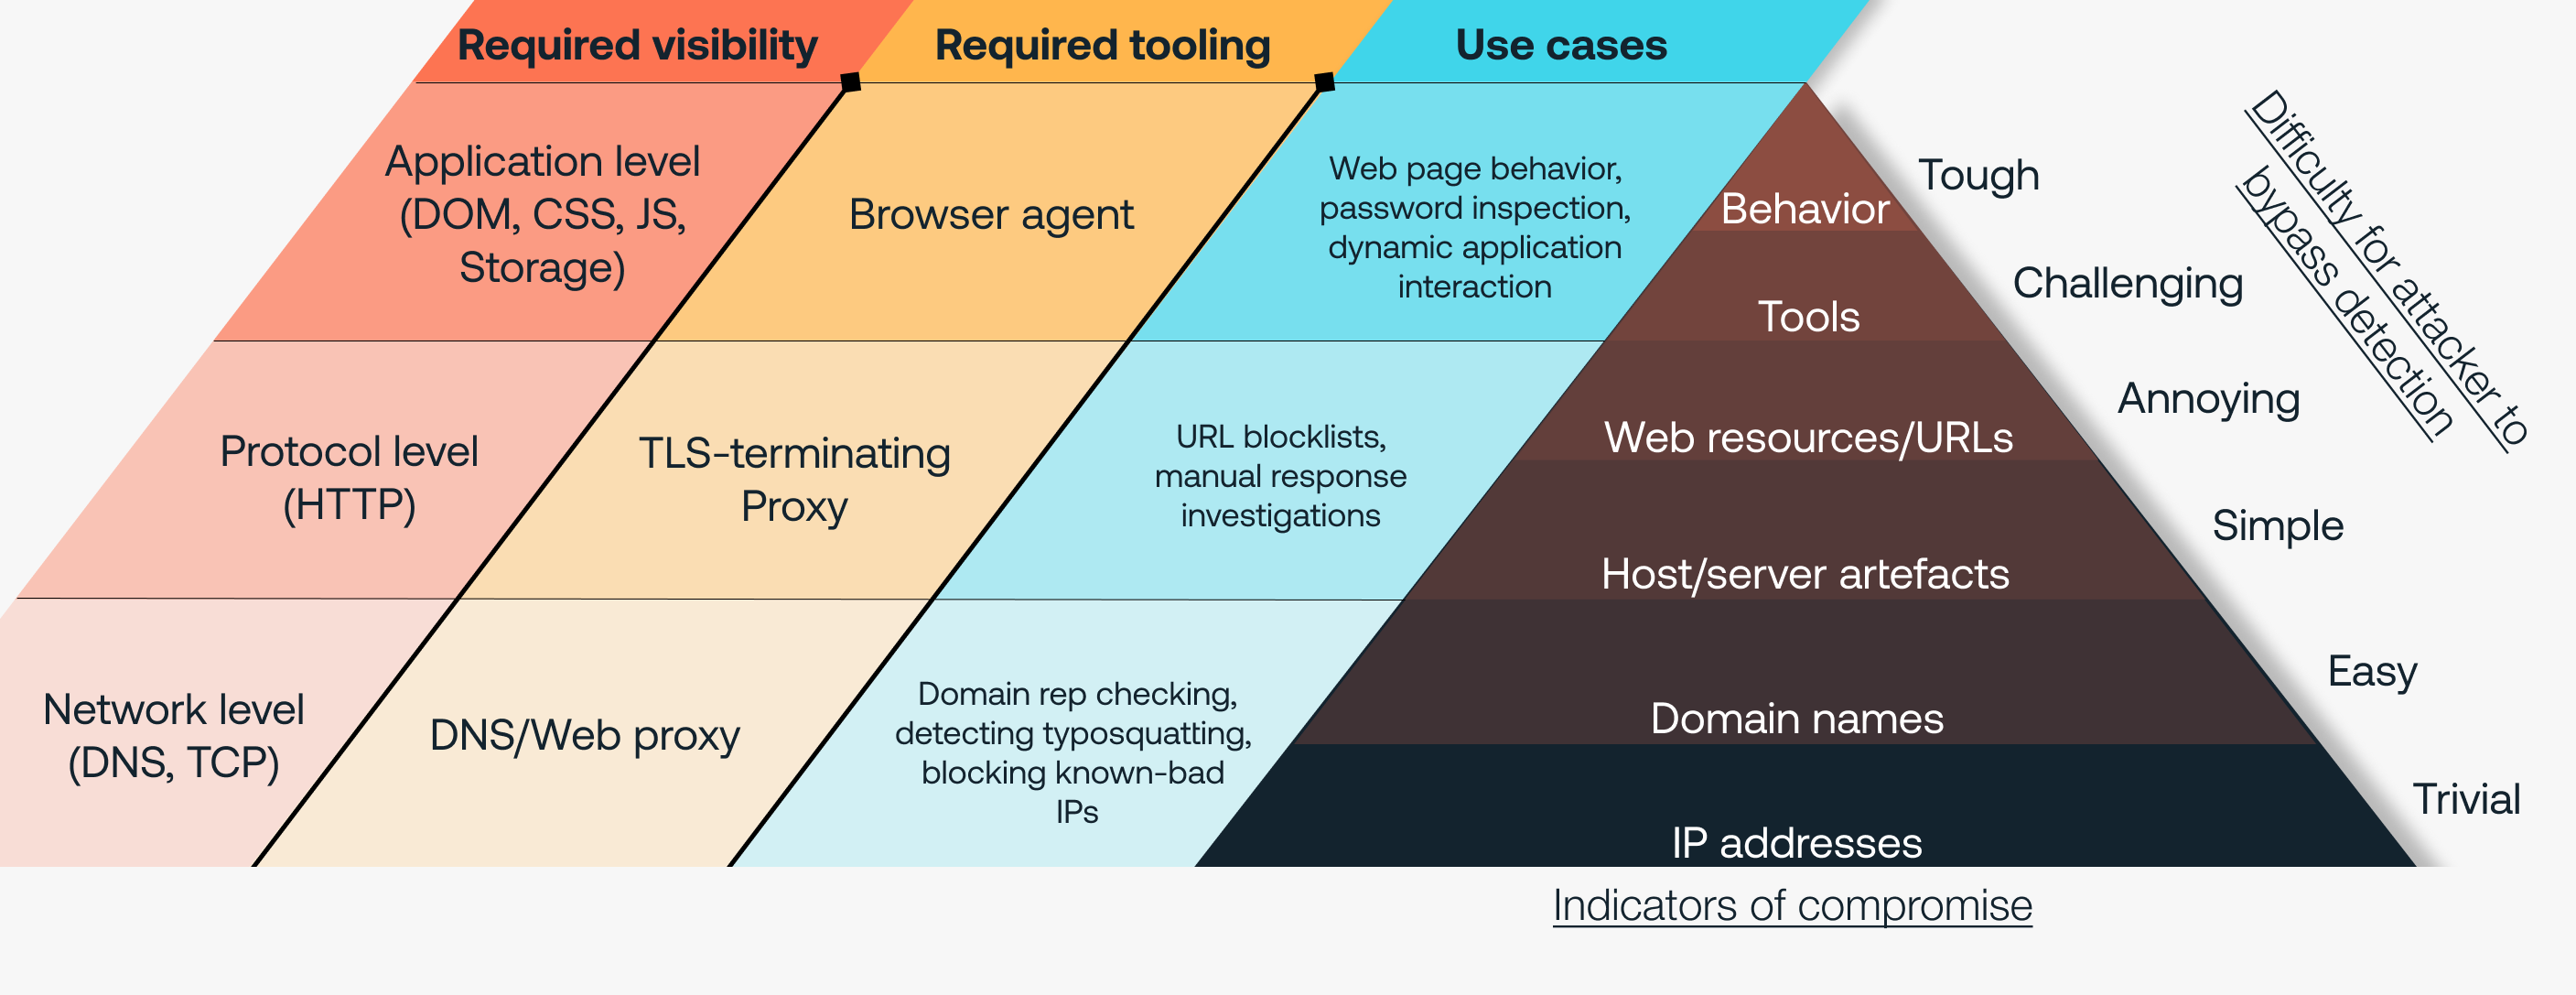
So, when you apply the Pyramid of Pain to some of the controls we’ve shipped this year, we get a clear feel for the value, from highest to lowest:
User Behavior: Detecting and blocking the user behavior of entering their password into any site that the password doesn’t belong to.
Tool Behavior: Detecting when a login page that you access is cloned from a legitimate page.
Tool Signature: Detecting and blocking access to a page with a known phishing kit signature present on the page.
Naturally, we want to continue focusing on the apex of the Pyramid – at TTPs and Tools – to ensure that the controls we build are as robust as possible, and can’t be bypassed by attackers.
The power of the Push browser agent
You might ask: If it’s so simple, why hasn’t this been done yet? Well, before now, there was no good way of doing it! Teams simply didn’t have tools in the right place to be able to capture the level of data needed, or respond effectively (i.e. automatically, at the point of impact).
This is where being in the browser comes into play. The browser is a great place to observe the behavior of a page in real time, without needing to reconstruct decrypted HTTP data post-TLS termination and try to guess what the rendered page in all its Javascript-infused glory actually does, as we’ve blogged about previously. As we’ve seen through the ability to not only detect but prevent phishing attacks, it’s also a great control enforcement point, as you’re able to intercept the user at the point of impact, and you sit as closely as possible to where their work typically happens – in the browser.
To illustrate how crucial the browser is to implementing controls that sit at the apex of the Pyramid of Pain, we created a modified version designed specifically for identity attacks.
Conclusion
Hopefully, this blog post has shone a light on why we do things the way we do here at Push. The goal of building generic detections that are difficult, painful, and costly for attackers to bypass is a key part of our design strategy, and we look forward to sharing many more controls with you that demonstrate this in the future.
